Sausage Dressing with Pistachios and Blueberries

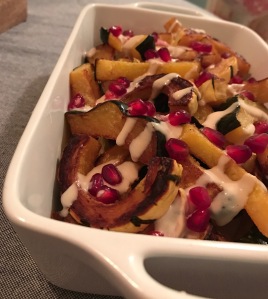
Of all the traditional Thanksgiving foods, I’ve gotta say that stuffing or dressing is my least favorite. It’s usually a little soggy, the flavors aren’t super exciting, and there’s not a lot of texture to it. When I decided I wanted to try to make a dressing that I DID like, I knew I’d have my work cut out for me; I wanted LOTS of flavor, and I wanted the texture to be just a little custard-y on the inside.

I’ll be honest, I’m the one who came up with it, and this flavor combination seemed a little odd even to ME, at first! But, I’m glad I trusted my instincts and went for it, because the combination of the spicy sausage and the sweet blueberries was really interesting, and delicious. I hope you enjoy it, too!

 Sausage Dressing with Pistachios and Blueberries

Sausage Dressing with Pistachios and Blueberries
serves 4-6 as a side (can easily be doubled)

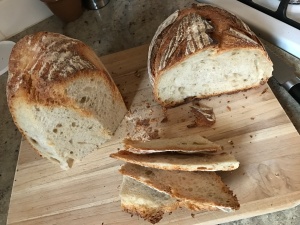
8oz high quality bread, stale, cut into 1″ cubes*
8oz hot Italian sausage
one medium sweet onion, diced
3oz dried blueberries
1 Tbsp apple cider vinegar
3oz shelled pistachios, roughly chopped
2oz feta cheese
3 Tbsp minced fresh parsley
1 cup + 2 Tbps chicken stock, divided
1/2 cup heavy cream
1 egg
olive oil
kosher salt and black pepper

 Sausage Dressing with Pistachios and Blueberries

*your bread cubes should be pretty dry and crusty. If they’re not, spread them out onto a baking sheet and pop them into a 250° oven for about 20-30 minutes to dry them out. Let the bread cool before continuing.

 Sausage Dressing with Pistachios and Blueberries

1.) Preheat your oven to 350°. Heat a couple teaspoons of olive oil in a skillet over medium heat, and add your Italian sausage. Brown the sausage, crumbling it as you go. Add the onion, and cook until translucent, about 3 minutes.

2.) Add the dried blueberries to the skillet, along with a good pinch each of salt and pepper. Stir everything together, and then add two tablespoons of chicken stock and one tablespoon apple cider vinegar to deglaze the pan; use a wooden spoon to scrape all the browned bits up from the bottom of the skillet. Continue cooking until most of the liquid is gone (the blueberries should reconstitute and plump up just a bit).

 Sausage Dressing with Pistachios and Blueberries

3.) Whisk together the heavy cream, one cup of chicken stock, the egg, and a good pinch each of salt and pepper. Set aside.

4.) Put the bread cubes into a large bowl, and top with the sausage mixture. Pour in half the chicken stock mixture, and stir to combine everything so that the bread is evenly moistened.

 Sausage Dressing with Pistachios and Blueberries

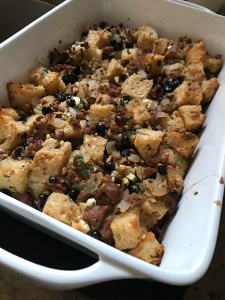
5.) Add the pistachios, parsley, and feta; pour in the rest of the chicken stock mixture, and stir again. Pour everything into a baking dish sprayed with non-stick or olive oil spray, and spread it into an even layer.

6.) Cover the dish with foil, and bake for 25 minutes. After 25 minutes, remove the foil, bump the oven temp to 375°, and bake for another 15-20 minutes, until the top of the dressing is a deep golden brown.

 Sausage Dressing with Pistachios and Blueberries

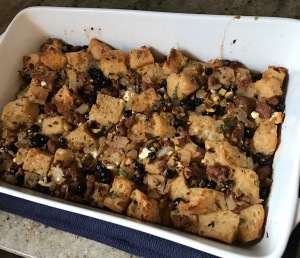
7.) Allow the dressing to set for about ten minutes, and serve.

I tell you what, this dressing is big on flavor AND texture. Crispy, crunchy bread, chewy, spicy sausage, the little pops of sweetness from the blueberries… and let’s not forget the roasty, salty, crunch from the pistachios. I think you could add it to your Thanksgiving table, right alongside the traditional stuffing, if you wanted to; it’s such a different flavor profile, and it would be a nice addition to the more classic Thanksgiving dishes.

 Sausage Dressing with Pistachios and Blueberries

Alright, I’ve got (at least) one more recipe coming your way, hopefully tomorrow… a delicious and easy non-traditional dessert!

The best part about this dressing is that it never saw the inside of a bird,
Tina

Roasted Squash with Tahini Maple Sauce and Pomegranate

This was one of those recipes that came to me piece by piece, over the course of a week or two. I was gonna tell you the (boring) (long) story of how all the elements of this recipe appeared in my head, but… who cares?? The important part is that it’s really, really, REALLY damn delicious, and you should try it. And you might wanna double the recipe, just to be safe.

Roasted Squash with Tahini Maple Sauce and Pomegranate

Roasted Squash with Tahini Maple Sauce and Pomegranate
serves 4-6 as a side

1 medium acorn squash
1 medium delicata squash
olive oil
1/2 tsp garlic powder
1/2 tsp ground mustard
kosher salt
1/3 cup tahini
generous 1 Tbsp maple syrup
juice of half a lemon
hot water, to thin
1/2 cup pomegranate seeds

Roasted Squash with Tahini Maple Sauce and Pomegranate

1.) Preheat your oven to 400°. Cut your squash in half lengthwise, and clean all the seeds and guts out with a spoon. Slice each half into 1/2″ half moons (if necessary, cut the acorn squash half moons into quarter moons, so they are approximately the same size as the delicata squash pieces).

2.) Line a baking sheet with non-stick foil, and toss the squash with 1-2 tablespoons of olive oil, the garlic powder, ground mustard, and 1/2 teaspoon of kosher salt. When all the squash is evenly coated, roast it for about 30-40 minutes, flipping once, until the squash is nicely browned and tender.

Roasted Squash with Tahini Maple Sauce and Pomegranate

3.) While the squash roasts, make your tahini maple sauce. Whisk together the tahini, maple syrup, lemon juice, and a pinch of kosher salt. More than likely, you’ll find the sauce is REALLY thick; add hot water, a tablespoon at a time, until it’s a nice, pourable consistency. (Depending on how thick your tahini is, you might have to add a tablespoon of water just before serving to loosen it back up; mine thickened back up kinda quickly.)

4.) When the squash is done, pile it into a serving dish. Drizzle the sauce over the top, and sprinkle the pomegranate seeds on top. Serve immediately.

Roasted Squash with Tahini Maple Sauce and Pomegranate

I was genuinely shocked at how delicious this turned out. I mean, I was pretty sure it would be tasty, but I seriously couldn’t keep my fork out of the dish. I just kept going back for more… and more… and more. The sweet squash is offset by the incredibly savory tahini sauce, and the sweet, tart, crunch of the pomegranate seeds is the perfect finishing touch. As a bonus, this dish is so PRETTY! It just looks like fall, and also feels fancy enough to be placed next to your gorgeous turkey.

Who’d have thought squash could be so exciting?
Tina

Coconut Lime Scones

Scones are one of my very favorite breakfast/brunch treats. They’re not something I have the occasion to enjoy super often (breakfast is typically a something thrilling like greek yogurt or peanut butter toast, plus fruit), so I really like to dress my scones up when I DO have them (not that there is a damn thing wrong with a plain scone, because there most certainly is not). I was recently at a coffee shop with a friend, and I spied a blueberry lemon scone in the pastry case, so I ordered it to go with my hot chocolate (I don’t drink coffee – it’ll stunt my growth, and I plan to be 5’4″ by the time I’m 35)… and it SUCKED. Just straight up sucked. It wasn’t flaky and buttery and light. It was stale, dry, flavorless, and utterly disappointing.

It’s hard being a baked goods snob, you guys. My life ain’t easy.

Coconut Lime Scones

Anyways, a few weeks later I had the occasion to make some breakfast treats for a morning event, and I seized the opportunity to really do it up. No way a boring, flavorless scone is coming out of my kitchen! I’m not gonna lie, these bad boys were damn tasty. I would (and will) make them again in a heartbeat.

They’re relatively quick and easy to make, they’re pretty, and the bulk of the ingredients are things you might already have in your pantry! (Feel free to tell me I’m nuts if I think everyone has coconut cream in their pantry, I can take it.)

Coconut Lime Scones

Coconut Lime Scones

For the scones:
one stick (8T) butter, very cold
3 cups all-purpose flour
1/4 cup sugar
1.5 tablespoons baking powder
3/4 teaspoon kosher salt
3/4 cup shredded, sweetened coconut
zest of 2 limes
3/4 cup heavy cream
3/4 cup coconut cream*

For the glaze:
zest of one lime
juice of 1-2 limes
powdered sugar (about 1 cup)

Coconut Lime Scones

*I buy the coconut cream from Trader Joe’s, but you can find it in the Asian section of your grocery store, usually. It’s thicker and has more fat that coconut milk, but you can use coconut milk if that’s all you can find. Just DON’T use lite or low-fat coconut milk!

1.) Preheat your oven to 425°. In a large bowl, whisk together the flour, sugar, baking powder, salt, shredded coconut, and lime zest.

2.) Using a pastry cutter or two knives, cut the butter into the flour mixture, until the largest pieces of butter are the size of small peas.

3.) Pour the heavy cream and coconut cream into the flour and butter mixture, and use a rubber spatula to mix everything together (be careful not to overmix – you want all the ingredients to JUST come together).

4.) Lightly dust your countertop with flour, and turn the scone dough out onto it, including any dry bits of flour. Knead the dough together just a few times, until it holds together. Pat into a rectangle, and cut into about 12 even squares.

5.) Line a baking sheet with parchment or a silpat, and place the scones on it, about 2″ apart. Bake for 14-17 minutes, until the scones are nice and golden brown at the edges.

6.) Remove the scones from the oven, and allow to cool for about 5 minutes before moving them to a cooling rack to cool completely.

7.) While the scones cool, you can mix up your glaze. You want about 3 tablespoons of lime juice; stir in the zest, and add powdered sugar as necessary until you get a nice, thick-but-drizzleable (yeah, it’s a word) consistency.

8.) When the scones are totally cool, drizzle them with the glaze – as much or as little as you like. They are definitely best the day they’re made, but will hold up well in a loosely covered dish overnight.

Coconut Lime Scones

Not that I would have personal experience with something like this, but I’m just SAYING… if, perhaps, you were to over-indulge on this upcoming holiday weekend, these scones would make a great morning-after breakfast with a side of your caffeine of choice. Feel free to pair them with a mimosa, if a little hair of the dog is more your speed. I’m certainly not judging.

You bring the bacon and mimosas, I’ll cover the baked goods,
Tina

Gruyere and Black Pepper Biscuit Sandwiches (with Strawberry Balsamic Jam)

I’ve always said: “Happiness is a warm, fluffy, buttermilk biscuit!”

Actually, that’s a lie – I’ve never said that before. But, I have felt that sentiment deep down in my heart for a very long time, and NOW I’m saying it… and I mean it! Seriously, a buttermilk biscuit is a beautiful, wonderful thing, especially when it’s fresh from the oven and slathered in butter. Part of the beauty of a buttermilk biscuit is that you can dress it up in millions of ways. Add cheese! Pop it on top of a chicken pot pie! Slice it in half and use it to sandwich a delicious piece of fried chicken!

(Stop drooling on your keyboard. It’s unsightly.)

ANYWAYS. When I was brainstorming some menu ideas for a wedding shower I was helping to throw, I knew I wanted to make a biscuit sandwich of some sort. A biscuit sandwich fulfills many of the requirements for food at a brunch: it’s dainty, it’s cute, it’s carb-y to soak up all the mimosas in your stomach. I wanted to add a couple other elements, too – something Italian (I met the bride while working in her dad’s Italian bakery nearly 20 years ago), something cheesy (please tell me I don’t need to explain the need for cheese?), and something to give it a real savory/spicy edge. Mission accomplished!

Gruyere and Black Pepper Biscuit Sandwiches (with Strawberry Balsamic Jam)

Gruyere and Black Pepper Biscuit Sandwiches (with Strawberry Balsamic Jam)
makes about 16 petite sandwiches, with jam left over

For the jam:
1 pound strawberries, rinsed, hulled and quartered
1 cup brown sugar
2 T water
1/4 cup balsamic vinegar (white, if you have it)
a healthy pinch of kosher salt

For the biscuits:
3 cups all-purpose flour
3 t baking powder
1/2 t baking soda
generous 1/2 t kosher salt
3/4 t coarsely ground black pepper
8 T butter, super cold, and cut into cubes
2 oz gruyere cheese, grated (about 1/2 cup)
1 1/2 cups cold buttermilk

For the sandwiches:
16 thin slices of prosciutto
arugula

Gruyere and Black Pepper Biscuit Sandwiches (with Strawberry Balsamic Jam)

1.) Start by getting your jam going on the stovetop. Add all the jam ingredients to a small sauce pan, stir well to combine, and set over medium heat. Let the mixture come up to a boil; turn the heat back just a bit (you don’t want it to be a hard boil, but you want more action than a simmer), and let the mixture cook down until it’s nice and thick. Keep an eye on it, and stir often, and it should take about 45 minutes.

2.) While the jam cooks, make your biscuit dough (and preheat your oven to 425°). In a large bowl, whisk together the flour, baking powder, baking soda, kosher salt, and black pepper. Using a pastry blender (or two knives, or your hands), cut the butter into the flour mixture, until there are still some bits of butter the size of small peas. (More thorough biscuit-dough-making directions are here.)

3.) Add the grated cheese to your flour/butter mixture, and use a fork to toss it all together until the cheese is evenly distributed. Then, drizzle the buttermilk around the bowl, and use the fork to lightly mix everything, until a shaggy dough starts to form.

4.) Lightly flour your countertop, and dump the dough out on to it. Working quickly, press the dough together into a lump, and then shape it into a square that’s about 3/4″ thick. Remember, the goal is to handle the dough as little as possible, so it doesn’t get overworked and it stays COLD!

5.) Cut the dough into 16 neat squares. (You can also cut traditional round biscuits out of the dough – I just find the rolling of scraps to be cumbersome, and the constant handling of those extra pieces can result in a tough biscuit. So, I go with squares.) Place the biscuits on to a parchment-lined baking sheet, about 2″ apart. Bake for 12-15 minutes, until the biscuits have risen nicely, and are a light golden brown on top.

6.) While your biscuits bake, finish up your jam. Dependent on what kind of texture you want, you can do a few things: leave it as is (for a super-chunky jam); mash up the strawberries with a potato masher (for a finer, but still chunky, jam); or blend the jam with an immersion blender (or in a traditional blender, for a much smoother jam). Let the jam cool completely.

7.) When your biscuits are done baking, let them cool on the baking sheet for a few minutes, then move them to a cooling rack to cool completely.

Gruyere and Black Pepper Biscuit Sandwiches (with Strawberry Balsamic Jam)

8.) Time to assemble the sandwiches! Gently slices the biscuits in half, and then spread jam on both sides of the biscuit. Layer on a piece of prosciutto, a small bunch of arugula, and then the top half of the biscuit. Serve at room temperature.

These sandwiches really have a lot of flavor going on – but it all ends up working really nicely together. The biscuits are nice and savory from the gruyere, and a little spicy, from the pepper. The prosciutto is smoky and salty, and pepperiness of the arugula complements the biscuit, and the strawberry balsamic jam adds just enough sweetness to round it all out. They’re rich and delicious, but small enough not to be too filling and heavy.

A couple items of note:

1.) You’ll have lots of jam left over. Use it on EVERYTHING – your morning toast, a slice of toasted baguette slathered in goat cheese, drizzled into your yogurt, eaten directly off a spoon. It will last for several weeks in the fridge.

2.) If you’re making these sandwiches for a party, make the biscuits ahead and freeze them. Once the biscuits are cut, lay them out on a parchment-lined baking sheet, and pop the baking sheet into the freezer. After 3 or 4 hours, when the outsides are completely firm, toss them all into a ziploc freezer bag, and keep them frozen until you’re ready to use them. Bake from frozen, but allow about 25 minutes for them to bake. (This is also a good idea if you just want to keep biscuits on hand for quick breakfasts or snacks – you can bake as many or as few at a time as you like.)

Gruyere and Black Pepper Biscuit Sandwiches (with Strawberry Balsamic Jam)

If you’re still feeling apprehensive about attempting homemade biscuits, just DO IT. It takes a little practice and finesse, but once you’ve got the hang of it, you’ll be so glad you tried it. You can do it!

A world of buttery, flaky, deliciousness awaits you,
Tina