Roasted Squash with Tahini Maple Sauce and Pomegranate

This was one of those recipes that came to me piece by piece, over the course of a week or two. I was gonna tell you the (boring) (long) story of how all the elements of this recipe appeared in my head, but… who cares?? The important part is that it’s really, really, REALLY damn delicious, and you should try it. And you might wanna double the recipe, just to be safe.

Roasted Squash with Tahini Maple Sauce and Pomegranate

Roasted Squash with Tahini Maple Sauce and Pomegranate
serves 4-6 as a side

1 medium acorn squash
1 medium delicata squash
olive oil
1/2 tsp garlic powder
1/2 tsp ground mustard
kosher salt
1/3 cup tahini
generous 1 Tbsp maple syrup
juice of half a lemon
hot water, to thin
1/2 cup pomegranate seeds

Roasted Squash with Tahini Maple Sauce and Pomegranate

1.) Preheat your oven to 400°. Cut your squash in half lengthwise, and clean all the seeds and guts out with a spoon. Slice each half into 1/2″ half moons (if necessary, cut the acorn squash half moons into quarter moons, so they are approximately the same size as the delicata squash pieces).

2.) Line a baking sheet with non-stick foil, and toss the squash with 1-2 tablespoons of olive oil, the garlic powder, ground mustard, and 1/2 teaspoon of kosher salt. When all the squash is evenly coated, roast it for about 30-40 minutes, flipping once, until the squash is nicely browned and tender.

Roasted Squash with Tahini Maple Sauce and Pomegranate

3.) While the squash roasts, make your tahini maple sauce. Whisk together the tahini, maple syrup, lemon juice, and a pinch of kosher salt. More than likely, you’ll find the sauce is REALLY thick; add hot water, a tablespoon at a time, until it’s a nice, pourable consistency. (Depending on how thick your tahini is, you might have to add a tablespoon of water just before serving to loosen it back up; mine thickened back up kinda quickly.)

4.) When the squash is done, pile it into a serving dish. Drizzle the sauce over the top, and sprinkle the pomegranate seeds on top. Serve immediately.

Roasted Squash with Tahini Maple Sauce and Pomegranate

I was genuinely shocked at how delicious this turned out. I mean, I was pretty sure it would be tasty, but I seriously couldn’t keep my fork out of the dish. I just kept going back for more… and more… and more. The sweet squash is offset by the incredibly savory tahini sauce, and the sweet, tart, crunch of the pomegranate seeds is the perfect finishing touch. As a bonus, this dish is so PRETTY! It just looks like fall, and also feels fancy enough to be placed next to your gorgeous turkey.

Who’d have thought squash could be so exciting?
Tina

Whatchamacallit Rice Krispie Treats

If you’ve never experienced the wonder that is a Whatchamacallit candy bar, I am sorry to tell you that you are SERIOUSLY missing out. Sure, the Whatchamacallit doesn’t get the glory of a Snickers, or a Milky Way, or a Reese’s Peanut Butter Cup… but there is a boatload of deliciousness to be had in this unassuming candy bar. (You guys, you can’t even find a bag of mini Whatchamacallits at Halloween… awfully RUDE, candy overlords!) It’s crunchy, it’s caramel-y, it’s subtly peanut butter-y – all without being overly sweet or overwhelmed by chocolate.

Whatchamacallit Rice Krispie Treats

As an ardent lover of rice krispie treats (I can easily take down an entire pan on my own), I occasionally sit around and daydream about how I could make a standard rice krispie treat more delicious. Clearly, my life is more exciting than you can possibly comprehend. Anyways, one day I was hit with a stroke of genius – that I could make a rice krispie treat that would taste like a Whatchamacallit! It took me several months to actually decide to do it (let’s be honest, I don’t particularly need a gigantic pan of rice krispie treats staring me down all week)… but over the weekend, the urge struck, and I just decided to go with it. I had all the ingredients, I was in the mood for a kind of salty/sweet dessert… and now I’m doing that thing where I keep walking by the plate of treats, cutting off a sliver here or there, just eating a little bit at a time. I fully expect all of them to be gone by this evening.

Whatchamacallit Rice Krispie Treats

Whatchamacallit Rice Krispie Treats
makes one 9×13 pan of treats

5 T salted butter
8oz marshmallows
3 T peanut butter
generous 1/4 cup salted caramel sauce
approx. 7 cups rice krispies
2oz milk chocolate, chopped
1 tsp coconut oil (or vegetable oil)

Whatchamacallit Rice Krispie Treats

1.) Start by melting your butter in a large pot, over medium low heat. Once the butter is melted, add your peanut butter and caramel sauce and stir, so the warm butter starts to melt the peanut butter.

2.) Add in your marshmallows, and stir continuously so the sugars don’t burn, until everything is melted and smooth.

3.) Remove the pan from the heat, pour in your rice krispies, and use a rubber spatula to gently fold them into the marshmallow mixture. I like to start with maybe 6 cups of rice krispies, and add more as needed – you want to be sure they’re not too dry!

4.) Spray a 9×13 pan with baking spray, and press the rice krispie mixture into the pan (lightly wet your hands to keep everything from sticking).

5.) Add the chocolate and coconut oil into a small bowl, and microwave in 20 second increments until it melts and can be stirred until smooth.

Whatchamacallit Rice Krispie Treats

6.) Scoop the chocolate into a small sandwich bag, and snip off a tiny bit of one corner. Drizzle the chocolate over the treats in whatever pattern you like! Let the treats cool and the chocolate harden (you can stick them in the fridge for 20 minutes or so, if you’re impatient like me), and then cut into squares. Enjoy!

IMG_6003

YESSSSSSSSSS. These Whatchamacallit treats were EXACTLY what I had in mind. A little salty, a little sweet… nutty, buttery, and juuuust enough chocolate. And, because they consist primarily of puffed rice, they don’t taste heavy or too rich (all the better to eat 18 of them in one sitting). Keep in mind, you can mess with the proportion of caramel to peanut butter, too – I wanted the peanut butter to be present, but not overwhelming (as it is in a Whatchamacallit), but if you’re a peanut butter fanatic, feel free to use more PB. I am not sure why I’m admitting this, but I added my peanut butter and caramel sauce to the pan, and kept tweaking until the mixture smelled like a Whatchamacallit. Evidently, I am intimately familiar with the exact scent produced by the Whatchamacallit-specific ratio of peanut butter and caramel. Please feel free to be embarrassed on my behalf.

The nose knows,
Tina

Shrimp and Jalapeño Enchiladas Verde

I’ve been on an enchilada kick lately. I was trying to think of something relatively healthful for dinner, something that would taste kind of indulgent without actually BEING indulgent… and I realized that as long as I kept the cheese minimal, enchiladas could be a fairly health-conscious option. It had been several years since I had made them – and I decided that instead of my usual standby of chicken, I wanted to use shrimp. And now, several weeks and half a dozen enchilada dinners later, I think I’ve got a hell of a recipe to share! Of course, if you don’t feel like making them yourself, you can always just swing by my house, because we basically have enchiladas once a week these days. Just make sure you call first, because my husband generally commandeers no fewer than eight enchiladas for himself, and I’d hate to run short of food when I have guests. How embarrassing!

Shrimp and Jalapeño Enchiladas Verde

(Please note: my methodology skips the step that quickly and lightly fries the tortillas to keep them from breaking. It honestly makes no difference if the tortillas crack or break – they still taste damn good, even if they look less than perfect. These days, I am focused on getting in and out of the kitchen as fast as I can on weeknights, which means I can’t be bothered to fuss with another pan and another step. I will still gladly shovel ugly enchiladas into my food-hole!)

Shrimp and Jalapeño Enchiladas Verde

Shrimp and Jalapeño Enchiladas Verde
serves 2-4

12 corn tortillas (6″)
1lb shrimp
1 large sweet onion, sliced
2 jalapeño peppers
24oz jar of salsa verde (I prefer Herdez brand)*
1/2 tsp garlic powder
2oz cream cheese**
3oz monterey jack cheese, grated***
kosher salt
vegetable oil

*It’s not totally necessary, but I like to drain my salsa a bit to draw out the excess liquid before I start cooking with it. I set a fine mesh strainer over a bowl, and pour the salsa into it; after 3 or 4 minutes, it will have drained a few tablespoons worth of liquid, and be nice and thick.

Shrimp and Jalapeño Enchiladas Verde

**Full-fat or low-fat is fine – but don’t you dare let me catch you using fat free. That stuff is an abomination.

***You remember the First Rule of Melty Cheese, right? Thou shalt grate thy own cheese, and leave that awful pre-shredded stuff for some other sucker. Don’t ever forget that rule, it’s super important for maximum melty cheese enjoyment.

1.) Preheat your oven to 350°. Heat a large pan over medium heat, and add one tablespoon of vegetable oil to the pan. Once the oil is hot, add the sliced onion.

2.) Sauté the onion until it starts to soften and become translucent. Meanwhile, cut one of the jalapeños in half, and scrape out the seeds and ribs. Slice it into very thin strips, and add it to the pan. Continue the cook the vegetables until their edges are slightly browned, and they’ve softened.

Shrimp and Jalapeño Enchiladas Verde

3.) Cut your shrimp into bite-size pieces. Push the sautéed onions and peppers to the sides of your pan, and add the shrimp. (Be sure to add a splash more oil to the pan, if it’s looking a little dry.) Season everything with a big pinch of kosher salt, and the garlic powder.

Shrimp and Jalapeño Enchiladas Verde

4.) Add half the salsa verde to the pan, along with the cream cheese. Lower the heat, and stir to combine everything. Cook just until the cream cheese has melted and incorporated into the salsa (so the shrimp don’t overcook and become rubbery), and you’re ready to build your enchiladas.

Shrimp and Jalapeño Enchiladas Verde

5.) Add half the remaining salsa to the bottom of the large baking dish, and spread it into a thin layer. Spoon a bit of the shrimp filling on to the center of each tortilla, being careful not to overfill them. Roll each enchilada, and place it seam-side down into the baking dish. Repeat until all the tortillas and all the filling have been used.

Shrimp and Jalapeño Enchiladas Verde

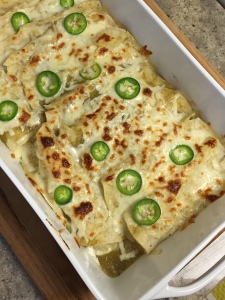
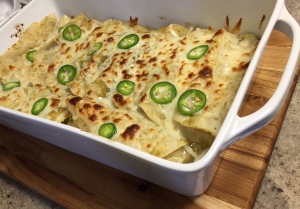
6.) Once all the enchiladas are rolled and in the baking dish, spread the remaining salsa verde over the top of them. Sprinkle the grated monterey jack cheese over the enchiladas. Take the second jalapeño, and slice it very, very thinly. Lay the jalapeño slices across the top of the cheese, and then sprinkle the entire dish with a bit of kosher salt.

Shrimp and Jalapeño Enchiladas Verde

7.) Bake for 10-15 minutes, until the enchiladas are warmed through. Finish with a minute or two under the broiler, so the cheese gets nicely browned.

8.) Let the enchiladas rest for a couple minutes, so the cheese has a chance to set up. Serve and enjoy!

Shrimp and Jalapeño Enchiladas Verde

As I write this, I actively annoyed that I do not have any leftovers to enjoy at this moment in time. These enchiladas are sooooo good! I want to eat them every day! I realize that’s not terribly practical, but the heart wants what it wants, man.

Shrimp and Jalapeño Enchiladas Verde

To recap, here’s what we’ve got going on: sweet, caramelized onions. Melty, perfectly browned cheese. Fresh, crunchy, SPICY jalapeños. Hearty, perfectly cooked shrimp. Bright, tart salsa verde. These enchiladas are proof that I was a very, very good person in a former life, and that all that excellent karma is coming back my direction. All that excellent, cheesy karma (insert heart-eyes emoji here).

This is one of the few exceptions to the “no cheese with seafood” rule,
Tina

Salsa di Parmigiana

I hate to be overly dramatic so early on a Monday morning, but… it must be said that this recipe will change your life. It’s not just delicious (and sweet baby Moses, is it delicious), but it goes on EVERYTHING. It’s the universal condiment! You’ll make it, and then you’ll spend the next week of your life spooning a little bit on to every. damn. thing. you eat. It’s that good. Don’t say I didn’t warn you.

Salsa di Parmigiana with Dutch Oven Bread

Salsa di Parmigiana
recipe very slightly adapted from here

8 oz parmigiano reggiano*
8 oz asiago cheese
3-4 cloves garlic, grated
3 scallions, thinly sliced
1-2 tsp red pepper flakes
2 tsp dried oregano
1 tsp coarsely ground black pepper
1 to 1.5 cups extra virgin olive oil

*This is the time to pony up the cash for the real deal. Don’t buy the weird, rubbery domestic chunk of parm that comes vacuum-sealed in plastic from Kraft – find the legit, pay-by-the-pound stuff that’s in the fancy cheese case. Yes, it’s like $18 a pound, but it’s SO WORTH IT. Your taste buds will thank you. (And don’t you dare toss that rind when you cut it off the parmesan! Put it in a ziploc bag, throw it in your freezer, and add it to your next pot of soup.)

Salsa di Parmigiana

1.) Cut the parmesan and asiago into large chunks (roughly 1″ or so). Add all the cheese to your food processor, and pulse until the cheese is broken down to pea-sized chunks. Transfer the cheese to a large mixing bowl.

Salsa di Parmigiana

2.) Add the garlic, scallions, red pepper flakes, oregano, and pepper, and give everything a good stir with a rubber spatula. Grated garlic temps to clump up, so be sure to get those clumps broken up as best you can.

Salsa di Parmigiana

3.) Pour one cup of olive oil over the cheese mixture, and stir to combine everything. Add more olive oil as needed – you want the salsa to be a bit looser than a paste, but not soupy or overly wet.

Salsa di Parmigiana

4.) Spoon the salsa into an airtight container of your choice. It’s best to let it sit for a few hours before using it to let all the flavors marry, but it will certainly be delicious right out of the gate, too. The salsa will keep for a couple weeks in the fridge.

And now, what to do with this gigantic container of cheesy salsa goodness?? Let’s see…

– spoon it on to some crostini or nice, crusty italian bread
– mix it into some scrambled eggs, right at the end
– use it as your “sauce” for a white pizza
– spoon over the top of sauteed green beans
– spread it on top of a burger
– pour it directly into your mouth

Salsa di Parmigiana Burger with Arugula

I am dead serious when I say that my husband added this to every single meal he ate for three or four days straight. You’ll think that the recipe makes a ton, and you’re right… but it will disappear before your very eyes. Next thing you know, you will be fighting with your spouse over who gets the last spoonful, and running to the grocery store in a panic, desperate to buy another million dollar chunk of parmesan.

ALERT: if you are looking to impress the hell out of someone(s), may I recommend bringing this salsa to a gathering along with a loaf of this embarrassingly easy bread? Combined, the two will take a grand total of like, 12 minutes of active time in the kitchen – and whomever you serve them to will become convinced that you are Ina Garten’s long-lost child. You’re welcome.

Why NOT replace all the fresh, healthful vegetables in a salsa with dairy products?!
Tina