Roasted Squash with Tahini Maple Sauce and Pomegranate

This was one of those recipes that came to me piece by piece, over the course of a week or two. I was gonna tell you the (boring) (long) story of how all the elements of this recipe appeared in my head, but… who cares?? The important part is that it’s really, really, REALLY damn delicious, and you should try it. And you might wanna double the recipe, just to be safe.

Roasted Squash with Tahini Maple Sauce and Pomegranate

Roasted Squash with Tahini Maple Sauce and Pomegranate
serves 4-6 as a side

1 medium acorn squash
1 medium delicata squash
olive oil
1/2 tsp garlic powder
1/2 tsp ground mustard
kosher salt
1/3 cup tahini
generous 1 Tbsp maple syrup
juice of half a lemon
hot water, to thin
1/2 cup pomegranate seeds

Roasted Squash with Tahini Maple Sauce and Pomegranate

1.) Preheat your oven to 400°. Cut your squash in half lengthwise, and clean all the seeds and guts out with a spoon. Slice each half into 1/2″ half moons (if necessary, cut the acorn squash half moons into quarter moons, so they are approximately the same size as the delicata squash pieces).

2.) Line a baking sheet with non-stick foil, and toss the squash with 1-2 tablespoons of olive oil, the garlic powder, ground mustard, and 1/2 teaspoon of kosher salt. When all the squash is evenly coated, roast it for about 30-40 minutes, flipping once, until the squash is nicely browned and tender.

Roasted Squash with Tahini Maple Sauce and Pomegranate

3.) While the squash roasts, make your tahini maple sauce. Whisk together the tahini, maple syrup, lemon juice, and a pinch of kosher salt. More than likely, you’ll find the sauce is REALLY thick; add hot water, a tablespoon at a time, until it’s a nice, pourable consistency. (Depending on how thick your tahini is, you might have to add a tablespoon of water just before serving to loosen it back up; mine thickened back up kinda quickly.)

4.) When the squash is done, pile it into a serving dish. Drizzle the sauce over the top, and sprinkle the pomegranate seeds on top. Serve immediately.

Roasted Squash with Tahini Maple Sauce and Pomegranate

I was genuinely shocked at how delicious this turned out. I mean, I was pretty sure it would be tasty, but I seriously couldn’t keep my fork out of the dish. I just kept going back for more… and more… and more. The sweet squash is offset by the incredibly savory tahini sauce, and the sweet, tart, crunch of the pomegranate seeds is the perfect finishing touch. As a bonus, this dish is so PRETTY! It just looks like fall, and also feels fancy enough to be placed next to your gorgeous turkey.

Who’d have thought squash could be so exciting?
Tina

Sweet Potato Tart with Fire-Roasted Green Chile Sauce and Whipped Ricotta

I’m not sure if I’ve ever managed to post a Thanksgiving recipe here BEFORE Thanksgiving. And with Thanksgiving 2016 being, oh, TEN short days away, that doesn’t give me much time… but this year, I’m gonna make it happen. I’ve been in a bit of a cooking rut for quite a while, and I decided the other day that a great way to get myself OUT of that rut would be to come up with some new and interesting Thanksgiving dishes. And so, here we are! I’ve got several dishes on tap for this week, and I’m gonna do my best to get them all up here in the next seven days – because, seriously, there is nothing more annoying than having ALL your grocery shopping done, and then stumbling across a recipe you really want to add to your menu the morning of Thanksgiving, and then being forced to go fight the masses at the grocery store, where you lose your will to live and begin to hate the whole of humanity. It’s possible I’m projecting my own personal issues, here.

Sweet Potato Tart with Fire-Roasted Green Chile Sauce and Whipped Ricotta

Up first is a sweet potato version of the traditional Pommes Anna, which is a delightful potato tart of sorts, made up of layers and layers of very thinly sliced potatoes. It’s a beautiful dish, and such a fun change of pace from the traditional Thanksgiving sweet potato dishes (marshmallow-topped yams, I’m looking at you).

Two disclaimers before we jump in:

1.) While a mandoline is not absolutely essential to make this dish, your life is going to be 1,000 times easier if you use one. It’s a great tool to have on hand anyway, so do yourself a favor and Amazon Prime one to your house immediately.

Sweet Potato Tart with Fire-Roasted Green Chile Sauce and Whipped Ricotta

2.) This dish is not at all hard, but it does involve quite a few steps and ingredients. The upside is that 2/3 of it can be made ahead of time. Believe me when I say, the work is worth it.

Sweet Potato Tart with Fire-Roasted Green Chile Sauce and Whipped Ricotta
serves 6-8 as a side

For the tart:
3 medium sweet potatoes, scrubbed clean
olive oil
kosher salt
2oz parmesan cheese, finely grated

Sweet Potato Tart with Fire-Roasted Green Chile Sauce and Whipped Ricotta

For the fire-roasted green chile sauce:
small can of diced fire-roasted green chiles
2 Tbsp white wine vinegar
1 large clove garlic
1 green onion
3 Tbsp plain greek yogurt or sour cream (NOT fat free)
1 tsp dijon mustard
red pepper flakes, to taste
1/4 tsp kosher salt
black pepper

For the whipped ricotta:
4oz cream cheese, at room temp
16oz full fat ricotta
kosher salt
black pepper
zest of half a lemon

1.) Preheat your oven to 425°. Grab an 8″ non-stick pan, and add about a tablespoon of olive oil to the bottom of it, ensuring it’s evenly coated.

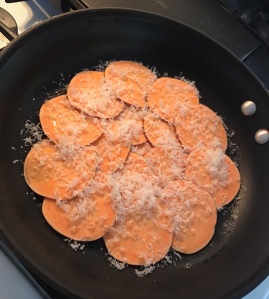
2.) Grab your mandoline and slice the sweet potatoes on the thinnest setting. Once they’re all sliced, start layering them into the (cold) non-stick pan, overlapping them slightly in concentric circles. This bottom layer will eventually be the top of your tart, so make sure it looks nice!

fullsizerender-6

3.) Brush the first layer of potatoes with a thin coat of olive oil, and season with kosher salt. Move on to the next layer of potatoes; be sure you brush each layer with olive oil and season it with salt. As for the parmesan cheese, sprinkle an even layer in between every OTHER layer of potatoes.

fullsizerender-7

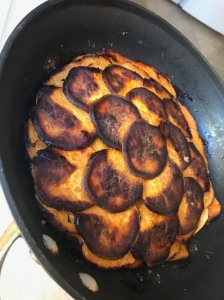
4.) When you’ve used all the potatoes, place the pan over medium heat. Once the tart starts to sizzle and the bottom layer of potatoes begins to brown (about 4-5 minutes), move the pan to the oven. Bake for 20 minutes.

5.) After 20 minutes, pull the pan out of the oven. Place a plate over the tart, and very carefully press the plate against the tart and tip the pan up over the sink to allow the hot oil to drain out (I prefer to do this with oven mitts on, in case any hot oil leaks out).

Sweet Potato Tart with Fire-Roasted Green Chile Sauce and Whipped Ricotta

6.) When the oil has drained, flip the tart out onto the plate. Add a bit more oil to the bottom of the pan, and slide the tart back into it (the side that was previously on the bottom of the pan should now be face up). Return the tart to the oven for 10 more minutes.

7.) While the tart is in the oven, you can make the fire-roasted green chile sauce. Simply throw all the ingredients into a blender or food processor, and blend until smooth.

8.) For the whipped ricotta, start by putting the cream cheese into the bowl of a stand mixer fitted with the whisk attachment. Whip the cream cheese until it’s nice and smooth, 2-3 minutes.

9.) Add the ricotta, and continue to whip the cheeses until they’re no longer grainy, about 3-4 minutes. Be sure to stop and scrape down the sides of the bowl a few times. When the cheese is just about done, add in the lemon zest, salt, and pepper, and whip just a bit longer.

10.) Once the tart is out of the oven, let it set for about 5 minutes before cutting into it. Slice it into wedges, and top each wedge with a drizzle of the green chile sauce, and a dollop of the whipped ricotta! You can garnish the tart with some additional green onions cut on an angle, if you want.

Sweet Potato Tart with Fire-Roasted Green Chile Sauce and Whipped Ricotta

While this recipe might not be the most ideal for a huge group of people, it’s perfect for a smaller crowd! It’s beautiful, and delicious, and relatively impressive looking, if you ask me. I also happen to love that it’s sort of visually reminiscent of a slice of pie topped with whipped cream!

One final note: if you’re looking at the crust on the tart in these photos and thinking it looks a little burnt, I want to assure you that it’s not! Sweet potatoes have a really high sugar content, so they’re going to caramelize and brown more than white potatoes. DO NOT be afraid to let your food (sweet, savory, or otherwise) get nice and deep, golden brown. That’s where the deliciousness happens!

Meet you back here in a couple days,
Tina

Salsa di Parmigiana

I hate to be overly dramatic so early on a Monday morning, but… it must be said that this recipe will change your life. It’s not just delicious (and sweet baby Moses, is it delicious), but it goes on EVERYTHING. It’s the universal condiment! You’ll make it, and then you’ll spend the next week of your life spooning a little bit on to every. damn. thing. you eat. It’s that good. Don’t say I didn’t warn you.

Salsa di Parmigiana with Dutch Oven Bread

Salsa di Parmigiana
recipe very slightly adapted from here

8 oz parmigiano reggiano*
8 oz asiago cheese
3-4 cloves garlic, grated
3 scallions, thinly sliced
1-2 tsp red pepper flakes
2 tsp dried oregano
1 tsp coarsely ground black pepper
1 to 1.5 cups extra virgin olive oil

*This is the time to pony up the cash for the real deal. Don’t buy the weird, rubbery domestic chunk of parm that comes vacuum-sealed in plastic from Kraft – find the legit, pay-by-the-pound stuff that’s in the fancy cheese case. Yes, it’s like $18 a pound, but it’s SO WORTH IT. Your taste buds will thank you. (And don’t you dare toss that rind when you cut it off the parmesan! Put it in a ziploc bag, throw it in your freezer, and add it to your next pot of soup.)

Salsa di Parmigiana

1.) Cut the parmesan and asiago into large chunks (roughly 1″ or so). Add all the cheese to your food processor, and pulse until the cheese is broken down to pea-sized chunks. Transfer the cheese to a large mixing bowl.

Salsa di Parmigiana

2.) Add the garlic, scallions, red pepper flakes, oregano, and pepper, and give everything a good stir with a rubber spatula. Grated garlic temps to clump up, so be sure to get those clumps broken up as best you can.

Salsa di Parmigiana

3.) Pour one cup of olive oil over the cheese mixture, and stir to combine everything. Add more olive oil as needed – you want the salsa to be a bit looser than a paste, but not soupy or overly wet.

Salsa di Parmigiana

4.) Spoon the salsa into an airtight container of your choice. It’s best to let it sit for a few hours before using it to let all the flavors marry, but it will certainly be delicious right out of the gate, too. The salsa will keep for a couple weeks in the fridge.

And now, what to do with this gigantic container of cheesy salsa goodness?? Let’s see…

– spoon it on to some crostini or nice, crusty italian bread
– mix it into some scrambled eggs, right at the end
– use it as your “sauce” for a white pizza
– spoon over the top of sauteed green beans
– spread it on top of a burger
– pour it directly into your mouth

Salsa di Parmigiana Burger with Arugula

I am dead serious when I say that my husband added this to every single meal he ate for three or four days straight. You’ll think that the recipe makes a ton, and you’re right… but it will disappear before your very eyes. Next thing you know, you will be fighting with your spouse over who gets the last spoonful, and running to the grocery store in a panic, desperate to buy another million dollar chunk of parmesan.

ALERT: if you are looking to impress the hell out of someone(s), may I recommend bringing this salsa to a gathering along with a loaf of this embarrassingly easy bread? Combined, the two will take a grand total of like, 12 minutes of active time in the kitchen – and whomever you serve them to will become convinced that you are Ina Garten’s long-lost child. You’re welcome.

Why NOT replace all the fresh, healthful vegetables in a salsa with dairy products?!
Tina

Coconut Maple Pecan Granola

I’ve never really understood the appeal of granola. I don’t dislike it or anything, it’s just not something that’s ever gotten me real hot and bothered, you know? Not to mention, I think most granolas are about 1,000,000 calories per four tablespoon serving, and if I’m gonna be blowing a week’s worth of calories in one sitting, I’m gonna be consuming those calories in the form of a giant pizza, thankyouverymuch.

Yogurt  + Granola Breakfast Bowls with Coconut Maple Pecan Granola

Anyways, in recent years, I’ve become a big fan of greek yogurt. It’s delicious, packed full of protein, comes in tons of flavors, and is easily portable – but I prefer to eat it with something added to it for crunch. (I feel weird eating a big bowl of food that requires absolutely no chewing, for reasons I can’t explain.) I’ve found a few different varieties of granola that are quite serviceable, but nothing that’s life-changing (in fairness, perhaps I’m expecting too much out of my breakfast)… until recently. And wonder of wonders, it was a homemade granola, served up in a tiny little pie shop in the middle of Detroit, that made me understand the appeal of granola. The most spectacular yogurt + granola bowl, with a starring ingredient of… mint! Mind. Officially. BLOWN. Clearly, the only appropriate course of action was to go home and recreate the entire bowl, from top to bottom.

Coconut Maple Pecan Granola

Coconut Maple Pecan Granola
makes… a whole bunch. I did not measure.

2.5 cups oats
1.5 cups coarsely chopped raw pecans
1/4 cup maple syrup
1/4 cup melted coconut oil
1/4 cup honey
1 tsp kosher salt
1/2 tsp ground ginger
2 oz roasted coconut*

Yogurt + Granola Breakfast Bowls
per individual serving

6 oz plain greek yogurt (2% or full fat)
honey to taste
1/4 cup Coconut Maple Pecan Granola
2 T dried cherries
3-4 mint leaves, minced or sliced into thin ribbons

*I love the roasted coconut chips from Trader Joe’s in this granola. If you don’t have a TJ’s near you, you can use flaked coconut of your choice – just be sure to toast it separate from the granola (either in a skillet or in the oven), as it will toast much faster than the rest of the ingredients, and you don’t want it to burn.

Yogurt  + Granola Breakfast Bowls with Coconut Maple Pecan Granola

1.) Preheat your oven to 300°F. While the oven preheats, whisk together the maple syrup, melted coconut oil, honey, kosher salt, and ground ginger. Pour the oats and raw pecans into the wet ingredients, and gently stir with a rubber spatula until everything is evenly coated.

2.) Line a baking sheet with parchment or a silicone baking sheet. Evenly spread the granola out on to the baking sheet, and place it in the oven.

3.) About every 10-15 minutes, remove the granola from the oven and give it a good stir before returning it. This will help ensure even browning.

4.) After about 35-40 minutes, the granola should have a nice, even, golden brown color. Stir it one last time, then put it back in the oven; turn the oven off and crack the oven door, and allow the granola to cool completely – about 45 minutes or so.

5.) Once the granola is totally cooled (you want to be sure there is NO warmth whatsoever – because that warmth will just translate to soggy granola once it’s stored), lightly crumble the coconut and add it to the granola. Transfer the granola to an airtight container. The granola will be good for several weeks, but I bet it won’t last that long!

Yogurt  + Granola Breakfast Bowls with Coconut Maple Pecan Granola

To assemble your yogurt and granola breakfast bowl, start with a base of yogurt; top with a drizzle of honey (as much or as little as you like). Add the granola, dried cherries, and mint. Enjoy!

I’m not sure why it didn’t occur to me sooner that, if I was not pleased with the granola options available to me, I should just make my own – but I can be a little dense sometimes, so, there ya have it. Turns out, granola is really easy to make, and can be customized in several million different ways – though I think this particular combination of ingredients is pretty darn heavenly.

I have to tell you, the use of mint in the yogurt and granola bowl was a huge surprise to me. I was half-convinced I would hate it – but as it turns out, it MADE the dish! It added a brightness and a freshness that was absolutely fantastic.

Guess it’s time to plant some mint in the backyard,
Tina