Spinach, Artichoke, and Chicken Spaghetti Squash Bake

This was one of those meals that sort of crept up on me, when I was considering what I had around the kitchen that needed to be used up (how many times have I said THAT before??). To be totally honest, I was kind of scared it would be terrible! But, the dinner gods smiled down upon me, and it was actually damn good. I can absolutely see myself making this again… maybe even as a side dish for a holiday. I am a huge, huge fan of spinach artichoke dip, and this definitely satisified that craving, while actually being pretty light! Magic, I tell you.

Spinach, Artichoke, and Chicken Spaghetti Squash Bake

Spinach Artichoke and Chicken Spaghetti Squash Bake
serves 6 generously

2 medium spaghetti squash
6 ounces whipped cream cheese
6 ounces 2% plain greek yogurt
10 ounce package frozen spinach
1 can artichoke hearts, drained well and chopped
1 pound chicken, cooked and diced
2 cloves garlic, grated
4 ounces monterey jack, grated
kosher salt
black pepper

Spinach, Artichoke, and Chicken Spaghetti Squash Bake

1.) Preheat your oven to 350°, and then start by dealing with your spaghetti squash. Cut off the stem, and then cut the squash in half lengthwise if you can; if you can’t without feeling like you’re going to lose a finger (or several), go ahead and bake that sucker whole. If you manage to get them cut in half, scrape out the seeds, place the halves cut-side down on a baking sheet, and bake for 45 minutes to an hour, until fork tender. (If you’re baking them whole, you’re probably going to need 60-90 minutes, depending on how large they are. When they’re softened and they’ve slumped a bit, pull them out, let them cool until you can handle them, and then cut them in half and scoop out the seeds.)

2.) While your squash bakes, you can make your spinach and artichoke mixture. Defrost the spinach in the microwave; allow it to cool, and then squeeze ALLLLL the water out (you should end up with a clump of spinach that’s pretty dry to the touch, and slightly smaller than a baseball).

3.) Add the spinach, chopped artichokes, chopped chicken, whipped cream cheese, greek yogurt, grated garlic, and about 1/2 teaspoon each of kosher salt and pepper to a bowl. Mix with a rubber spatula until everything is combined.

4.) When your squash is done roasting, leave your oven at 350°. Let the squash cool for a few minutes; then, take a fork and scrape out all the “spaghetti.” Put all the squash into another bowl, and season with a couple healthy pinches of salt and pepper. Toss the strands with tongs so that it all ends up evenly seasoned.

Spinach, Artichoke, and Chicken Spaghetti Squash Bake

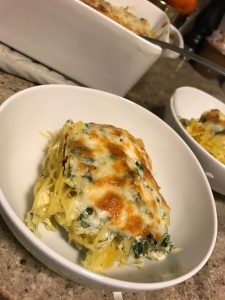
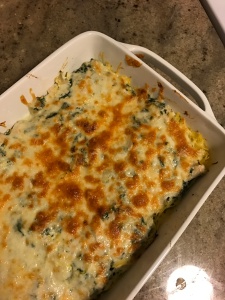
5.) At this point, I chose to layer my squash and spinach artichoke mixture; I was concerned that trying to mix it all together would result in the squash getting all broken up and mushy. Feel free to give that a shot if you’d like, and let me know how it goes! Anyways, spray a large baking dish with cooking spray. Spread half the squash out on the bottom of the dish; top that with half the spinach artichoke mixture, then the second half of the squash, then the rest of the spinach artichoke mixture. Top the entire thing with the grated monterey jack, and bake for about 30 minutes, until the cheese is melted and browned (you can always pass it under the broiler at the end if your cheese needs some help browning).

Spinach, Artichoke, and Chicken Spaghetti Squash Bake

6.) Let the dish stand for a few minutes so it sets a bit, then dig in and enjoy!

Spinach, Artichoke, and Chicken Spaghetti Squash Bake

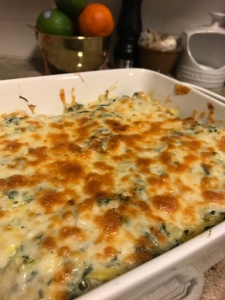
Now, listen… I am not one of those people that’s going to try and insist that spaghetti squash is JUST LIKE spaghetti! You’ll hardly know the difference! That is crap, and we all know it. However, spaghetti squash IS super neutral in flavor… so it’s a great vehicle for other, most interesting flavors. This dish is nice and creamy and cheesy – but it’s also STUFFED FULL of vegetables (and lots of protein, between the chicken and greek yogurt). So you can enjoy the hell out of it, and still feel smug and self-righteous because you just consumed, like, THREE servings of vegetables. BOOM.

Why are spaghetti squash SO DAMN HARD to cut???
Tina

Sausage Stuffed Zucchini Boats

May I ask a question? WHY do people like zucchini? I mean, I understand not disliking it, or thinking it’s fine… but, people who LOOOOOVE zucchini? WHY?? I just had to ask. I personally think it’s fine, and I will eat it, but I certainly don’t skip through the produce section, seeking out zucchini with joy in my heart. I’ve always found it to be kind of watery and tasteless, and usually mushy.

Sausage Stuffed Zucchini Boats

And with a glowing intro like that one… I assume you’re all ready for a zucchini recipe?? Yayyyy, zucchini! Seriously, though – I do try to vary my vegetable intake in the name of health, so I’m glad to have found a way to eat zucchini that I actually enjoy. Not to mention, this recipe is pretty quick and easy, and doesn’t dirty every bowl in the kitchen. Win-win-win.

Sausage Stuffed Zucchini Boats

Sausage Stuffed Zucchini Boats
serves 2-4

4 medium zucchini, cut in half lengthwise
half a yellow onion, diced fine
2 garlic cloves, minced or grated
1 pound italian sausage (pork or turkey is fine)
1 can diced tomatoes, drained well
1/2 cup cooked brown rice, farro, quinoa, or wheat berries*
2 oz cream cheese
2 T parmesan cheese
2 T minced hot peppers (jalapeno or cherry peppers are great), optional
3 oz monterey jack cheese, grated
olive oil
kosher salt
black pepper

*You can skip this if making a grain just for this purpose seems like a real pain in the ass. However, I think it’s an excellent use for some leftover rice or quinoa from another meal!

1.) Preheat your oven to 325°F. Using a spoon, scoop the seeds and some of the flesh out of the center of each zucchini half. Lightly drizzle the flesh of the zucchini boats with some olive oil, sprinkle with salt and pepper, and lay them cut side down on a foil-lined baking sheet. Bake for about 15 minutes, until the flesh is soft, but not mushy.

Sausage Stuffed Zucchini Boats

2.) While the zucchini bakes, start on the stuffing. Heat a skillet over medium heat, add about a tablespoon of oil, and saute your onions until they are translucent, 3-5 minutes. Add the garlic (along with a pinch of kosher salt and pepper – always season each layer of the dish), and cook until fragrant, about 30 seconds.

3.) Add the italian sausage to the pan; cook, breaking it up with a wooden spoon, until the sausage is cooked through.

4.) Throw in the drained tomatoes, brown rice, cream cheese, and parmesan. You can also add the hot peppers now, if you’re using them. My husband doesn’t care for hot peppers, so rather than adding them to the mix, I just sprinkled them on top of my zucchini boats, and left his plain. Stir everything together and cook until the cheese is melted and everything is warm.

Sausage Stuffed Zucchini Boats

5.) Turn on your oven’s broiler. Spoon the sausage mixture into the zucchini, and then top each one with some shredded monterey jack. Pop them under the broiler until the cheese is melted and browned, and then serve!

Sausage Stuffed Zucchini Boats

One of the best things about this dinner is that there is no need for a side dish! You’ve got your protein, your veggies, and your whole grains all in one place. And, you can totally change the recipe up to use whatever you have sitting in your fridge. You could do a version with bbq chicken and corn added to the mix… or go vegetarian and use canellini beans and ricotta instead of cream cheese.

Because the seeds and insides are removed from the zucchini (and they get baked, empty and upside down, for a while), it’s not watery at all. It’s just a great vehicle for holding all the delicious fillings! The number of servings you’ll get out of this will vary. For my particular husband, on the particular night we ate this meal, he took down FOUR zucchini halves (I ate two). On another day of the week, he might stop at two halves… or finish plowing through six. It’s hard to say. You could certainly serve this with a nice side salad or maybe some roasted potatoes, and help it stretch farther.

FINALLY, a decent recipe for squash,
Tina

Whatchamacallit Rice Krispie Treats

If you’ve never experienced the wonder that is a Whatchamacallit candy bar, I am sorry to tell you that you are SERIOUSLY missing out. Sure, the Whatchamacallit doesn’t get the glory of a Snickers, or a Milky Way, or a Reese’s Peanut Butter Cup… but there is a boatload of deliciousness to be had in this unassuming candy bar. (You guys, you can’t even find a bag of mini Whatchamacallits at Halloween… awfully RUDE, candy overlords!) It’s crunchy, it’s caramel-y, it’s subtly peanut butter-y – all without being overly sweet or overwhelmed by chocolate.

Whatchamacallit Rice Krispie Treats

As an ardent lover of rice krispie treats (I can easily take down an entire pan on my own), I occasionally sit around and daydream about how I could make a standard rice krispie treat more delicious. Clearly, my life is more exciting than you can possibly comprehend. Anyways, one day I was hit with a stroke of genius – that I could make a rice krispie treat that would taste like a Whatchamacallit! It took me several months to actually decide to do it (let’s be honest, I don’t particularly need a gigantic pan of rice krispie treats staring me down all week)… but over the weekend, the urge struck, and I just decided to go with it. I had all the ingredients, I was in the mood for a kind of salty/sweet dessert… and now I’m doing that thing where I keep walking by the plate of treats, cutting off a sliver here or there, just eating a little bit at a time. I fully expect all of them to be gone by this evening.

Whatchamacallit Rice Krispie Treats

Whatchamacallit Rice Krispie Treats
makes one 9×13 pan of treats

5 T salted butter
8oz marshmallows
3 T peanut butter
generous 1/4 cup salted caramel sauce
approx. 7 cups rice krispies
2oz milk chocolate, chopped
1 tsp coconut oil (or vegetable oil)

Whatchamacallit Rice Krispie Treats

1.) Start by melting your butter in a large pot, over medium low heat. Once the butter is melted, add your peanut butter and caramel sauce and stir, so the warm butter starts to melt the peanut butter.

2.) Add in your marshmallows, and stir continuously so the sugars don’t burn, until everything is melted and smooth.

3.) Remove the pan from the heat, pour in your rice krispies, and use a rubber spatula to gently fold them into the marshmallow mixture. I like to start with maybe 6 cups of rice krispies, and add more as needed – you want to be sure they’re not too dry!

4.) Spray a 9×13 pan with baking spray, and press the rice krispie mixture into the pan (lightly wet your hands to keep everything from sticking).

5.) Add the chocolate and coconut oil into a small bowl, and microwave in 20 second increments until it melts and can be stirred until smooth.

Whatchamacallit Rice Krispie Treats

6.) Scoop the chocolate into a small sandwich bag, and snip off a tiny bit of one corner. Drizzle the chocolate over the treats in whatever pattern you like! Let the treats cool and the chocolate harden (you can stick them in the fridge for 20 minutes or so, if you’re impatient like me), and then cut into squares. Enjoy!

IMG_6003

YESSSSSSSSSS. These Whatchamacallit treats were EXACTLY what I had in mind. A little salty, a little sweet… nutty, buttery, and juuuust enough chocolate. And, because they consist primarily of puffed rice, they don’t taste heavy or too rich (all the better to eat 18 of them in one sitting). Keep in mind, you can mess with the proportion of caramel to peanut butter, too – I wanted the peanut butter to be present, but not overwhelming (as it is in a Whatchamacallit), but if you’re a peanut butter fanatic, feel free to use more PB. I am not sure why I’m admitting this, but I added my peanut butter and caramel sauce to the pan, and kept tweaking until the mixture smelled like a Whatchamacallit. Evidently, I am intimately familiar with the exact scent produced by the Whatchamacallit-specific ratio of peanut butter and caramel. Please feel free to be embarrassed on my behalf.

The nose knows,
Tina

Salsa di Parmigiana

I hate to be overly dramatic so early on a Monday morning, but… it must be said that this recipe will change your life. It’s not just delicious (and sweet baby Moses, is it delicious), but it goes on EVERYTHING. It’s the universal condiment! You’ll make it, and then you’ll spend the next week of your life spooning a little bit on to every. damn. thing. you eat. It’s that good. Don’t say I didn’t warn you.

Salsa di Parmigiana with Dutch Oven Bread

Salsa di Parmigiana
recipe very slightly adapted from here

8 oz parmigiano reggiano*
8 oz asiago cheese
3-4 cloves garlic, grated
3 scallions, thinly sliced
1-2 tsp red pepper flakes
2 tsp dried oregano
1 tsp coarsely ground black pepper
1 to 1.5 cups extra virgin olive oil

*This is the time to pony up the cash for the real deal. Don’t buy the weird, rubbery domestic chunk of parm that comes vacuum-sealed in plastic from Kraft – find the legit, pay-by-the-pound stuff that’s in the fancy cheese case. Yes, it’s like $18 a pound, but it’s SO WORTH IT. Your taste buds will thank you. (And don’t you dare toss that rind when you cut it off the parmesan! Put it in a ziploc bag, throw it in your freezer, and add it to your next pot of soup.)

Salsa di Parmigiana

1.) Cut the parmesan and asiago into large chunks (roughly 1″ or so). Add all the cheese to your food processor, and pulse until the cheese is broken down to pea-sized chunks. Transfer the cheese to a large mixing bowl.

Salsa di Parmigiana

2.) Add the garlic, scallions, red pepper flakes, oregano, and pepper, and give everything a good stir with a rubber spatula. Grated garlic temps to clump up, so be sure to get those clumps broken up as best you can.

Salsa di Parmigiana

3.) Pour one cup of olive oil over the cheese mixture, and stir to combine everything. Add more olive oil as needed – you want the salsa to be a bit looser than a paste, but not soupy or overly wet.

Salsa di Parmigiana

4.) Spoon the salsa into an airtight container of your choice. It’s best to let it sit for a few hours before using it to let all the flavors marry, but it will certainly be delicious right out of the gate, too. The salsa will keep for a couple weeks in the fridge.

And now, what to do with this gigantic container of cheesy salsa goodness?? Let’s see…

– spoon it on to some crostini or nice, crusty italian bread
– mix it into some scrambled eggs, right at the end
– use it as your “sauce” for a white pizza
– spoon over the top of sauteed green beans
– spread it on top of a burger
– pour it directly into your mouth

Salsa di Parmigiana Burger with Arugula

I am dead serious when I say that my husband added this to every single meal he ate for three or four days straight. You’ll think that the recipe makes a ton, and you’re right… but it will disappear before your very eyes. Next thing you know, you will be fighting with your spouse over who gets the last spoonful, and running to the grocery store in a panic, desperate to buy another million dollar chunk of parmesan.

ALERT: if you are looking to impress the hell out of someone(s), may I recommend bringing this salsa to a gathering along with a loaf of this embarrassingly easy bread? Combined, the two will take a grand total of like, 12 minutes of active time in the kitchen – and whomever you serve them to will become convinced that you are Ina Garten’s long-lost child. You’re welcome.

Why NOT replace all the fresh, healthful vegetables in a salsa with dairy products?!
Tina